This project is part of the Robocademy
Robot Operating System Learning Path by
Lentin Joseph.
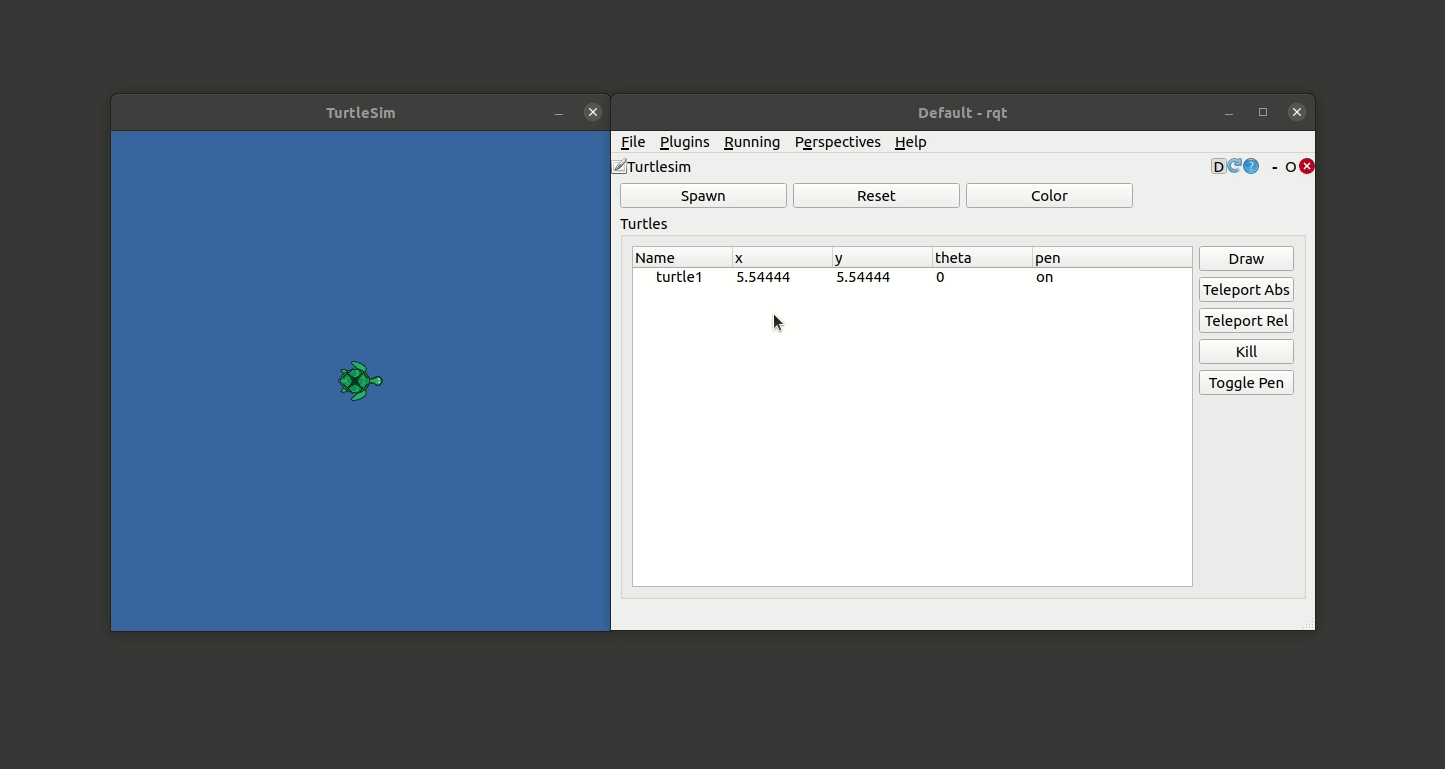
The project shows how the rqt_turtle plugin for ROS’ GUI framework rqt was created.
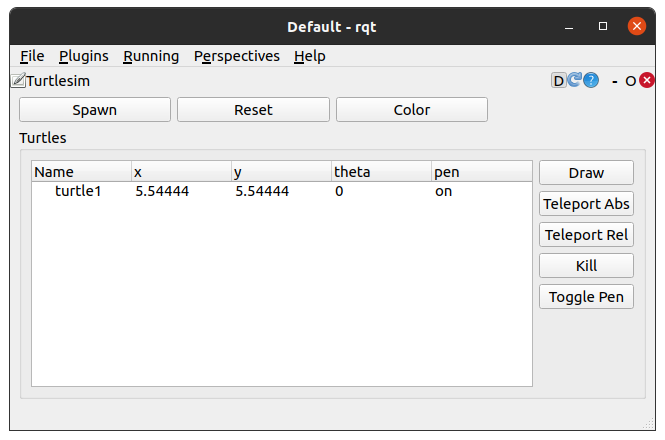
The final plugin looks like this:
The video below gives more insights on what is currently implemented:
The plugin can be used to draw inside turtlesim with turtlebot.
Although the following description might help you to write your own rqt plugin, also have a look at the official rqt tutorials, especially the tutorial Create your new rqt plugin.
There are tutorials explaining how to write plugins using python or C++. The rqt_turtle plugin is written in C++.
Note that the following documentation doesn’t list the full source code. For this The source code is hosted on GitHub.
The code tries to follow the ROS CppStyleGuide and the code API documentation can be created with doxygen. The code was written with the vscode ROS plugin that allows to debug rqt plugins using attach to process method. See the documentation on how to setup debugging and its debugging capabilities.
C++ vs Python
Note that most rqt plugins are written in Python and it is even recommended to write them in Python.
However, because of few documented C++ plugins, this project shows how to write a plugin in C++ and it is similar to the
rqt_image_view plugin that is also programmed in C++.
In case you are planning to reuse existing rqt plugins make sure to use the
language that they are written in. As you will see later in this writeup, I had to use some compromise to use existing rqt plugins which are were written in Python. Another drawback is that the XML-RPC functionality available from the ROS Master API is not well documented.
For example using Python to obtain service or topic information such as types or arguments is much easier with Python.
Create the Empty ROS Package
The first step is to create an empty ROS package and specify the required dependencies.
Note, that it is possible to add missing dependencies later on.
Inside a ros workspace use the catkin create command from catkin-tools to creat the empty rqt_turtle package:
$ catkin create pkg rqt_turtle \
    -a "Franz Pucher" "ros@fjp.at" \
    -m "Franz Pucher" "ros@fjp.at" \
    -l "MIT" \
    -d "rqt plugin for ROS rqt to draw in turtlesim using turtlebot." \
    --catkin-deps roscpp rqt_gui rqt_gui_cpp
This will add the roscpp client library and rqt related dependency packages to the plugin.
Modify the package content
This section follows the instructions in wiki.ros.org/rqt/Tutorials/Create your new rqt plugin.
package.xml
To make the rqt plugin discoverable, for catkin, we must declare the plugin in the package.xml by referencing a plugin.xml.
  <!-- The export tag contains other, unspecified, tags -->
  <export>
    <!-- Other tools can request additional information be placed here -->
    <rqt_gui plugin="${prefix}/plugin.xml"/>
  </export>
For more information see the catkin library dependencies.
plugin.xml
Now create the plugin.xml with the following content:
<!-- To make the plugin discoverable by rqt the path to the library librqt_turtle.so needs to be specified -->
<!-- The installed plugin library can be found in the devel/lib/ folder. -->
<library path="lib/librqt_turtle">
  <class name="rqt_turtle/TurtlePlugin" type="rqt_turtle::TurtlePlugin" base_class_type="rqt_gui_cpp::Plugin">
    <description>
      Plugin for ROS rqt to draw in turtlesim using turtlebot.
    </description>
    <qtgui>
      <!-- group the plugin into the folder Robot Tools... -->
      <group>
        <label>Robot Tools</label>
        <icon type="theme">folder</icon>
        <statustip>Plugins related to robot tools.</statustip>
      </group>
      <label>TurtleSim</label>
      <icon type="theme">input-tablet</icon>
      <statustip>Plugin for ROS rqt to draw in turtlesim using turtlebot.</statustip>
    </qtgui>
  </class>
</library>
A description of these xml attributes is found in the rqt tutorial.
The first attribute library path specifies the path to the library librqt_turtle.so which makes the plugin discoverable for rqt.
In this case the installed plugin library can be found in the ros workspace inside the devel/lib/ folder.
The rqt_turtle plugin will be grouped into the existing Robot Tools menu of rqt with the icon type input-table. The names
for other icons can be found in the Icon Naming Specification.
Design the UI
ROS rqt plugins are based on the Qt framework. When installing Qt,
using the official Ubuntu package sudo apt-get install qt5-default the required tools to develop Qt applications are installed too.
Qt provides its own Qt Creator IDE and a Designer that lets you create GUIs that work are cross platform, meaning they will work on Linux, macOS and Windows.
To design an ui file open a terminal and enter designer
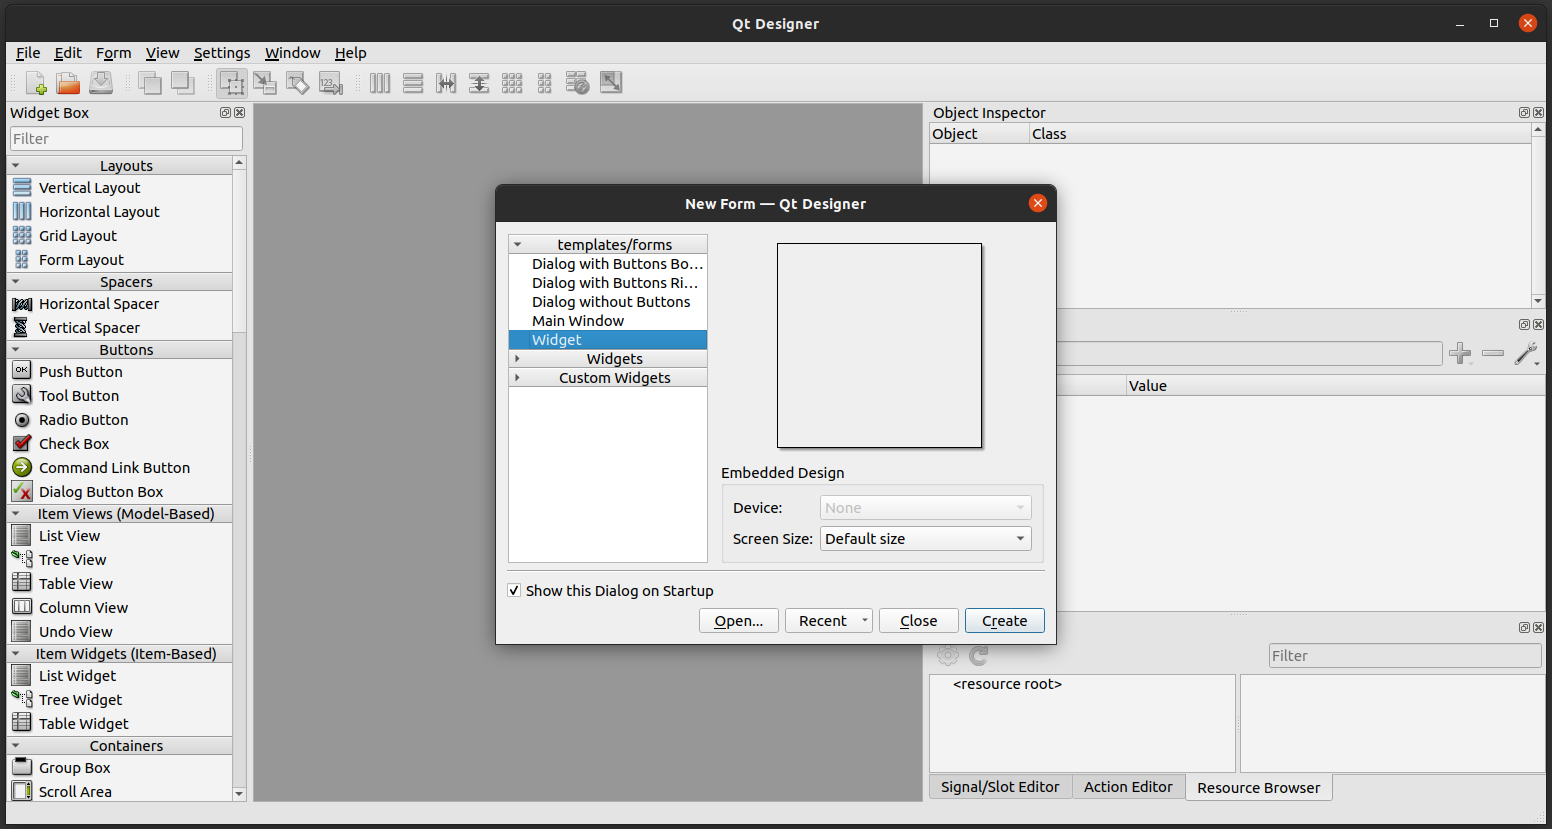
Select Widget from the New Form Wizard Dialog because rqt can be composed with plugins that are of type Qt Widgets.
This means you can turn existing Qt Widgets into rqt plugins.
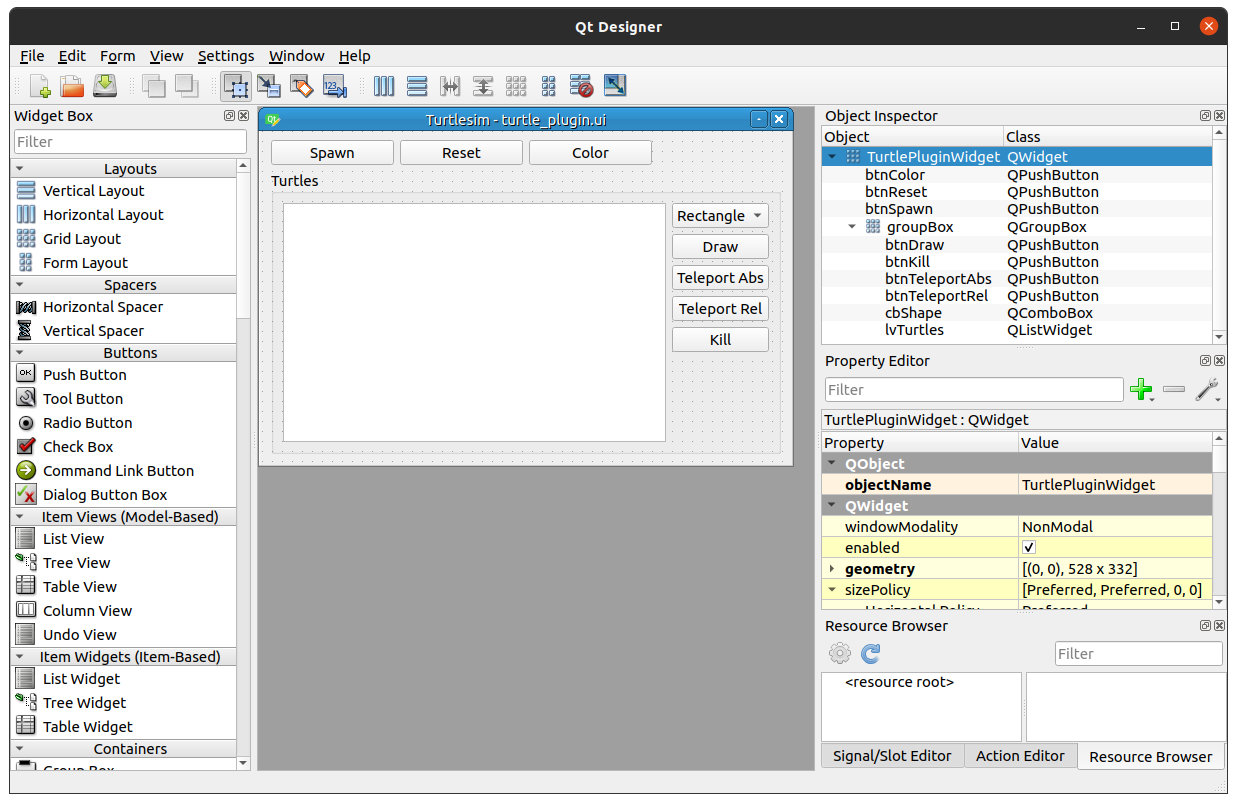
The following image shows the design of the rqt_turtle plugin. On the right you can see the components.
Write the Plugin Code
Instructions on how to write a plugin in C++ is found in this rqt tutorial.
Keep in mind the special note from the tutorial about using roscpp with rqt:
The plugin should not call init_node as this is performed by rqt_gui_cpp.
The plugin can use any roscpp-specific functionality (like Publishers and Subscribers or Parameters). Just make sure to stop timers and publishers, unsubscribe from Topics etc in the shutdown_plugin method.
A C++ plugin inherits from Nodelet and therefore gains the same advantages (i.e. enables exchanging boost>::shared_pointer).
Due to restrictions in Qt, you cannot manipulate Qt widgets directly within ROS callbacks, because they are running in a different thread. In the ROS callback you can:
- emit a Qt signal (which will bridge across the threads) and manipulate the widgets in the receiving slot
OR
- only operate on non-widget entities like QAbstractItemModels
ROS Components
ROS rqt makes use of the ROS pluginlib to dynamically load plugins at runtime.
Note that prior to pluginlib 1.9 (Groovy), the macros PLUGINLIB_REGISTER_CLASS and PLUGINLIB_DECLARE_CLASS were used to register exported classes.
These have been deprecated in favor of the new PLUGINLIB_EXPORT_CLASS. The new macro is simpler as it only takes two arguments.
See Pluginlib Simplified Export Macro.
/// Deprecated:
//PLUGINLIB_DECLARE_CLASS(rqt_turtle, TurtlePlugin, rqt_turtle::TurtlePlugin, rqt_gui_cpp::Plugin)
/// Use the new macro instead:
PLUGINLIB_EXPORT_CLASS(rqt_turtle::TurtlePlugin, rqt_gui_cpp::Plugin)
The ROS Master provides naming and registration sservices to the rest of the nodes in ROS.
It tracks publishers and subscribers to topics as well as services.
To obtain a list of existing turtles it would be possible to execute rostopic list from the command line and filter for the
topics that include /turtle_name/pose or /turtle_name/cmd_vel. The same can be achieved within a roscpp
node using the bool ros::master::getTopics(V_TopicInfo& topics) method, see also this example:
void TurtlePlugin::updateTurtleTree()
{
    // https://stackoverflow.com/questions/26785675/ros-get-current-available-topic-in-code-not-command
    // Use XML-RPC ROS Master API to get the topic names
    // Then filter for topics containing pose (which belongs to a turtle)
    ros::master::V_TopicInfo master_topics;
    ros::master::getTopics(master_topics);

    ros::NodeHandle nh = getNodeHandle();
    for (ros::master::V_TopicInfo::iterator it = master_topics.begin(); it != master_topics.end(); it++)
    {
        const ros::master::TopicInfo& info = *it;
        ROS_INFO_STREAM("topic_" << it - master_topics.begin() << ": " << info.name);
        QString topic_name = QString::fromStdString(info.name);
        if (topic_name.contains(QString("/pose")))
        {
            QStringList topic_name_parts = topic_name.split(QRegExp("\\/"), QString::SkipEmptyParts);
            std::string turtle_name = topic_name_parts[0].toStdString();
            ROS_INFO("topic_name_part 0: %s", turtle_name.c_str());

            // Wait for a single pose message to arrive on the turtlesim::Pose topic
            turtlesim::PoseConstPtr pose = ros::topic::waitForMessage<turtlesim::Pose>(topic_name.toStdString());
            ROS_INFO("Pose received: x: %f, y: %f, theta: %f", pose->x, pose->y, pose->theta);

            // Create new turtle in turtle vector
            // Note: assume that the pen is toggled on
            QSharedPointer<Turtle> turtle = QSharedPointer<Turtle>(new Turtle(turtle_name, *pose));
            turtles_[QString::fromStdString(turtle_name)] = turtle;
        }
    }

    // Insert the turtles into the QTreeWidget
    for (auto turtle : turtles_)
    {
        m_pUi->treeTurtles->insertTopLevelItem(0, turtle->toTreeItem(m_pUi->treeTurtles));
    }
}
The TurtlePlugin::updateTurtleTree() method can be called to get a list of currently active turtles in turtlesim.
This means that turtles can also be added the the rosservice command in another terminal and after refreshing the plugin the newly spawned turtles
will be listed.
Qt Components
After designing UIs there are (at least) three possible ways to use them inside an application, which are explained in more detail in the documentation:
- Direct Approach
- Single Inheritance
- Using a Member Variable
- Using a Pointer Member Variable recommended approach*
- Multiple Inheritance Approach
All of the approaches would work for rqt_turtle except the Direct Approach because it doesn’t allow us to use custom slots.
The reason to choose the Single Inheritance using a Pointer Member Variable approach is to avoid including the generated ui_name_of_gui.h inside the applications header file. Instead a forwrad declaradtion is made which allows to use the ui as pointer member. Then the generated ui_name_of_gui.h
can only be included in the applications source (cpp) file. The Single Inheritance using a Pointer Member Variable approach is used for all
ui files that are used in the rqt_turtle plugin.
Signal and Slots
The Qt framework uses a signal and slot mechanism to allow the communication between objects.
For the rqt_turtle plugin it is used to connect for example the buttons with the plugin’s main class, called TurtlePlugin, which handles
the button presses in its custom slots.
All the available turtles inside turtlesim are displayd in the treeTurtle widget of type QTreeWidget.
For this the previously mentioned TurtlePlugin::updateTurtleTree() is used. One important feature of the treeTurtle is to obtain the selected turtles.
This is done by connecting the QTreeWidget::itemSelectionChanged() signal of treeTurtle
connect(ui_->treeTurtles, SIGNAL(itemSelectionChanged()),
                this, SLOT(on_selection_changed()));
with the custom TurtlePlugin::on_selection_chagned() slot:
void TurtlePlugin::on_selection_changed()
{
    // Get list of selected turtles
    auto selected_items = m_pUi->treeTurtles->selectedItems();
    selected_turtles_.clear();
    if (selected_items.empty())
    {
        return;
    }
    QString turtle_name;
    std::stringstream ss;
    for (auto item : selected_items)
    {
        turtle_name = item->text(0);
        selected_turtles_.push_back(turtle_name);
        ss << str(turtle_name) << " ";
    }
    ROS_INFO("Selected %s", ss.str().c_str());
}
This will store the currently selected turtle names as QStrings in the member variable selected_turtles_ of type QVector<QString>.
If no turtles are selected the vector will be empty.
To store the turtles with their settings the plugin uses QMap
/// Vector to keep track of all turtles (keep turtles on the heap using vector of shared pointers)
QMap<QString, QSharedPointer<Turtle> > turtles_;
This maps the QString turtle names, for example obtained from selected_turtles_, to Turtle object pointers of type QSharedPointer<Turtle>. The Turtle class is used to encapsulate a turtle’s turtlesim::Pose, turtlesim::SetPen and name.
The QSharedPointer take care to delete turtles when no references are pointing to them.
There exist also QTreeView or QListView elements inside Qt but those don’t provide as much functionality than their *Widget counterparts do.
If you plan the implement such elements using your own functionality then probably the right choice is to use the rudimentary *View elements.
Otherwise the *Widget will be the right choice.
The main rqt_turtle ui provides the following QPushButtons, which have their clicked() signal connected to corresponding slots that do the acutal work:
- Spawn: connected to the
void TurtlePlugin::on_btnSpawn_clicked()slot to open a new uiServiceCaller.uidialog. - Reset: connected to the
void TurtlePlugin::on_btnReset_clicked()which calls theresetservice of turtlesim to bring it to the start configuration and set the background color to the value of the currently set background parameters. - Color: connected to the
on_btnColor_clickedslot which sets the RGB color values on the ROS parameter server used by turtlesim as background color, see turtlesim parameters. After changing the color, theclearservice is called to immediately update the new color.
The Spawn button and the two Teleport Abs and Teleport Rel buttons open a new dialog window.
Currently there are three different dialog implementations:
ServiceCaller.uifor “Spawn”, “Teleport Abs” and “Teleport Rel” buttons.Draw.uifor the Draw button.Task.uicalled within the Draw dialog to show the drawing progress.
For each ui there exists a class that inherits from QDialog to open a
modeless dialog -
following the same Single Inheritance using a Pointer Member Variable approach described above.
This allows us to show a modal dialog with the int QDialog::exec() method,
that can be blocked until the user closes it. Depending on what the user pressed in the dialog it’s possible to call
void QDialog::accept() or void QDialog::reject()
slots which will hide the dialog and set the return value of the QDialog::exec() method.
Note, that instead of QDialog::exec() QDialog::open()
is recommended to be used in combination with the void QDialog::finished(int result) signal.
The following two sections will describe ServiceCaller, Draw and Task uis and their corresponding classes in more detail.
One way to get data from a dialog is to implement a member function to obtain it. Example1, Example2. For this plugin this method is required to obtain the service message data entered by the user.
Service Caller
The ServiceCaller class together with it’s ui is used to call the available services of turtlesim.
ROS provides the rosservice tool which has the list subcommand to list all the available services that are
currently registered with the ROS master.
Note that it would be easier to use rospy to obtain service infos from the master.
Using roscpp makes it harder to get the required information.
The following list shows three approaches to get information from the ROS master when using roscpp:
- rosapi not covered here because it would require adding it as another dependency (reference answer, example).
- XML-RPC calls using ROS Master API This would be the way to go if the plugin was written in Python. The ROS Master API seems to be incomplete for C++ (reference answer).
- Calling terminal commands from C++ A hacky solution to execute ros commands such as
rosservice listwithin C++. The details of this approach are explained in the next section.
Before that, it is worth mentioning how the service calls are implemented:
For example the Spawn, Teleport Abs and Teleport Rel service calls make use of the [ros::service::calls()] method.
After pressing one of the buttons a new ServiceCaller class is created with the TurtlePlugin::widget_ member as parent and the desired service name.
std::string service_name = "/spawn";
service_caller_dialog_ = new ServiceCaller(widget_, service_name);
The name is used to fill the ServiceCaller::ui_::request_tree_widget. For this the mentioned rosservice args command is called from within
the ServiceCaller::createTreeItems(std::string service_name) method:
void ServiceCaller::createTreeItems(std::string service_name)
{
    ROS_INFO("Create Tree Items for service %s", service_name.c_str());

    // Get service type and args
    std::string cmd_type = "rosservice type " + service_name;
    ROS_INFO("cmd_type: %s", cmd_type.c_str());
    std::string service_type = exec_cmd(cmd_type);
    std::string cmd_args = "rosservice args " + service_name;
    std::string service_args = exec_cmd(cmd_args);
    QString qstr_service_args_line = QString::fromStdString(service_args);
    ROS_INFO("Service args: %s", qstr_service_args_line.toStdString().c_str());
    QStringList qstr_args = qstr_service_args_line.split(QRegExp("\\s+"), QString::SkipEmptyParts);

    // https://doc.qt.io/qt-5/qtreewidget.html#details
    QList<QTreeWidgetItem *> items;
    for (int i = 0; i < qstr_args.size(); ++i)
    {
        QStringList i_args;
        i_args.append(qstr_args[i]);
        // TODO type
        i_args.append(QString::fromStdString("float32"));
        // TODO init value depending on type
        i_args.append(QString::fromStdString("0.0"));
        QTreeWidgetItem* item = new QTreeWidgetItem(static_cast<QTreeWidget *>(nullptr), i_args);
        item->setFlags(Qt::ItemIsEditable|Qt::ItemIsEnabled);
        items.append(item);
    }
    m_pUi->request_tree_widget->insertTopLevelItems(0, items);
}
Here, request_tree_widget is filled with the service arguments, see the services Spawn, TeleportAbsolute and TeleportRelative as an example in the following figures:
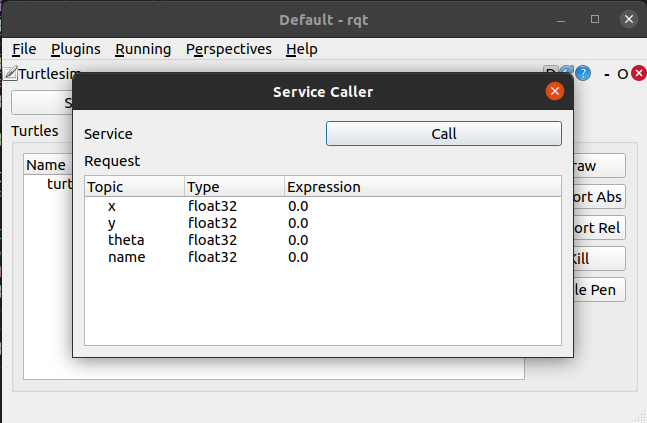
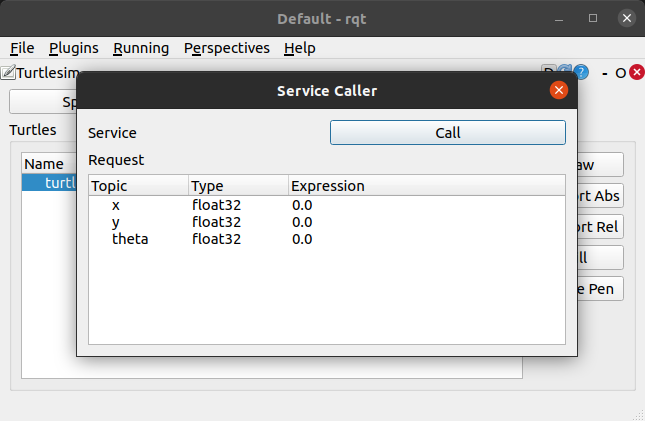
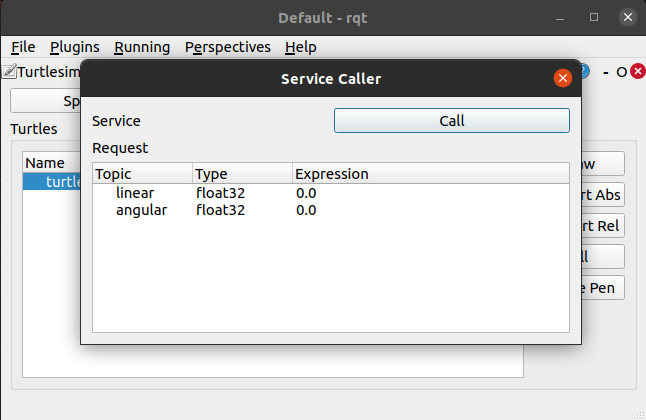
In the current implementation the types are not checked and therefore not displayed correctly, see future work section below.
After the user enters the desired pose and name of the turtle (when the spawn service was used) the data can be obtained in the TurtlePlugin class
with the QVariantMap ServiceCaller::getRequest() method:
QVariantMap ServiceCaller::getRequest()
{
    QVariantMap map;

    // https://doc.qt.io/archives/qt-4.8/qtreewidgetitemiterator.html#details
    QTreeWidgetItemIterator it(m_pUi->request_tree_widget);
    while (*it)
    {
        QString variable = (*it)->text(0);
        map[variable] = (*it)->text(2);
        ++it;
    }
    return map;
}
It returns a QVariantMap that is a QMap<QString, QVariant>.
Using QVariant as value is useful to deal with different types of data, for example string and float.
With this, the caller (in this case TurtlePlugin) knows what to expect from the ServiceCaller class and the ServiceCaller can be reused
for different types of services provided by turtlesim.
The ServiceCaller currently cannot handle nested service messages. For this use the rqt service caller plugin.
Command Line Interface Approach
This approach, to get for example the service list is kind of a hack and doesn’t leverage the XML-RPC backend of ROS. However, it is the simpler approach, which is why it’s used for the first/current version of this plugin.
The following C++ snippet shows how to get the output of a terminal command (source). In this plugin it’s used to get the output of ros commands within a roscpp node.
#include <cstdio>
#include <iostream>
#include <memory>
#include <stdexcept>
#include <string>
#include <array>

std::string exec(const char* cmd) {
    std::array<char, 128> buffer;
    std::string result;
    std::unique_ptr<FILE, decltype(&pclose)> pipe(popen(cmd, "r"), pclose);
    if (!pipe) {
        throw std::runtime_error("popen() failed!");
    }
    while (fgets(buffer.data(), buffer.size(), pipe.get()) != nullptr) {
        result += buffer.data();
    }
    return result;
}
XML-RPC Approach
This approach is currently not implemented. Instead the CLI approach described above is used to call ros commands within a roscpp node.
To get the service list in our C++ code we can make use of XML-RPC which ROS uses under the hood for its communication. With it we can query the ROS master through the ROS Master API.
First we need to include the master.h:
#include <ros/master.h>
Then we can create XmlRpc::XmlRpcValue request, response and payload objects which are required for the call.
// The request value can be set to any value
XmlRpc::XmlRpcValue request = "/node";
// The response object will receive the server messsage in xml format
XmlRpc::XmlRpcValue response;
XmlRpc::XmlRpcValue payload;
Finally, we need to call the getSystemState method of the master using the ros::master::execute method.
// http://wiki.ros.org/ROS/Master_API
// The following calls the getSystemState method with the previously defined request
// and returns the response and the payload.
ros::master::execute("getSystemState", request, response, payload, true);
To view the xml response we can make use of XmlRpc::XmlRpcValue::toXml:
ROS_INFO("%s", response.toXml().c_str());
The result will be an array that holds the xml tree:
<value><array><data><value><i4>1</i4></value><value>current system state</value><value><array><data><value><array><data><value><array><data><value>/rosout_agg</value><value><array><data><value>/rosout</value></data></array></value></data></array></value><value><array><data><value>/rosout</value><value><array><data><value>/rqt_gui_cpp_node_43389</value><value>/rqt_gui_cpp_node_43761</value><value>/rqt_gui_cpp_node_45610</value><value>/rqt_gui_cpp_node_47424</value><value>/rqt_gui_cpp_node_50133</value><value>/rqt_gui_cpp_node_50310</value><value>/rqt_gui_cpp_node_50562</value><value>/rqt_gui_cpp_node_57695</value></data></array></value></data></array></value></data></array></value><value><array><data><value><array><data><value>/rosout</value><value><array><data><value>/rosout</value></data></array></value></data></array></value></data></array></value><value><array><data><value><array><data><value>/rosout/get_loggers</value><value><array><data><value>/rosout</value></data></array></value></data></array></value><value><array><data><value>/rosout/set_logger_level</value><value><array><data><value>/rosout</value></data></array></value></data></array></value><value><array><data><value>/rqt_gui_cpp_node_43389/get_loggers</value><value><array><data><value>/rqt_gui_cpp_node_43389</value></data></array></value></data></array></value><value><array><data><value>/rqt_gui_cpp_node_43389/set_logger_level</value><value><array><data><value>/rqt_gui_cpp_node_43389</value></data></array></value></data></array></value><value><array><data><value>/rqt_gui_cpp_node_43761/get_loggers</value><value><array><data><value>/rqt_gui_cpp_node_43761</value></data></array></value></data></array></value><value><array><data><value>/rqt_gui_cpp_node_43761/set_logger_level</value><value><array><data><value>/rqt_gui_cpp_node_43761</value></data></array></value></data></array></value><value><array><data><value>/rqt_gui_cpp_node_45610/get_loggers</value><value><array><data><value>/rqt_gui_cpp_node_45610</value></data></array></value></data></array></value><value><array><data><value>/rqt_gui_cpp_node_45610/set_logger_level</value><value><array><data><value>/rqt_gui_cpp_node_45610</value></data></array></value></data></array></value><value><array><data><value>/rqt_gui_cpp_node_47424/get_loggers</value><value><array><data><value>/rqt_gui_cpp_node_47424</value></data></array></value></data></array></value><value><array><data><value>/rqt_gui_cpp_node_47424/set_logger_level</value><value><array><data><value>/rqt_gui_cpp_node_47424</value></data></array></value></data></array></value><value><array><data><value>/rqt_gui_cpp_node_50133/get_loggers</value><value><array><data><value>/rqt_gui_cpp_node_50133</value></data></array></value></data></array></value><value><array><data><value>/rqt_gui_cpp_node_50133/set_logger_level</value><value><array><data><value>/rqt_gui_cpp_node_50133</value></data></array></value></data></array></value><value><array><data><value>/rqt_gui_cpp_node_50310/get_loggers</value><value><array><data><value>/rqt_gui_cpp_node_50310</value></data></array></value></data></array></value><value><array><data><value>/rqt_gui_cpp_node_50310/set_logger_level</value><value><array><data><value>/rqt_gui_cpp_node_50310</value></data></array></value></data></array></value><value><array><data><value>/rqt_gui_cpp_node_50562/get_loggers</value><value><array><data><value>/rqt_gui_cpp_node_50562</value></data></array></value></data></array></value><value><array><data><value>/rqt_gui_cpp_node_50562/set_logger_level</value><value><array><data><value>/rqt_gui_cpp_node_50562</value></data></array></value></data></array></value><value><array><data><value>/rqt_gui_cpp_node_57695/get_loggers</value><value><array><data><value>/rqt_gui_cpp_node_57695</value></data></array></value></data></array></value><value><array><data><value>/rqt_gui_cpp_node_57695/set_logger_level</value><value><array><data><value>/rqt_gui_cpp_node_57695</value></data></array></value></data></array></value></data></array></value></data></array></value></data></array></value>
To access the relevant part - the service list - we can use the following for loop:
const int num_services = response[2][2].size()

// Create a string array holding the service names
std::string services[num_services];
for(int x=0; x < num_services; x++)
{
    // Get the xml part containing a service value
    // e.g., <value>/rosout/get_loggers</value>
    std::string service_name = response[2][2][x][0].toXml().c_str();

    // remove <value> and </value> from the string
    service_name.erase(service_name.begin(), service_name.begin()+7);
    service_name.erase(service_name.end()-8, service_name.end());
    services[x] = service_name;
    ROS_INFO(service_name.c_str());
}
Expand for an alternative solution.
An alternative to the above snippet would be to use TinyXML, a C++ XML parsing library.
To load the xml from the response string use TiXmlDocument::Parse() (see this SO answer):
TiXmlDocument doc;
doc.Parse((const char*)response.toXml().c_str(), 0, TIXML_ENCODING_UTF8);
Then it should be possible to parse the XML with the steps outlined in the TinyXML tutorial.
std::string message;
MessageMap messages;

TiXmlHandle hDoc(&doc);
TiXmlElement* pElem;
TiXmlHandle hRoot(0);

// block: name
{
    pElem=hDoc.FirstChildElement().Element();
    // should always have a valid root but handle gracefully if it does
    if (!pElem) return;
    m_name=pElem->Value();

    // save this for later
    hRoot=TiXmlHandle(pElem);
}

// block: string table
{
    messages.clear(); // trash existing table

    pElem=hRoot.FirstChild( "Messages" ).FirstChild().Element();
    for( pElem; pElem; pElem=pElem->NextSiblingElement())
    {
        const char *pKey=pElem->Value();
        const char *pText=pElem->GetText();
        if (pKey && pText)
        {
            messages[pKey]=pText;
        }
    }
}
Useful references for working with XML-RPC in the roscpp client library are this answer and the ROS Master API Wiki page.
Draw Dialog
The Draw.ui declares a QWidget named DrawWidget that is used as a QDialog.
It provides two tabs, one to draw a shape using the turtle_shape service from the turtle_actionlib.
Expand for rqt turtle draw shape demo.
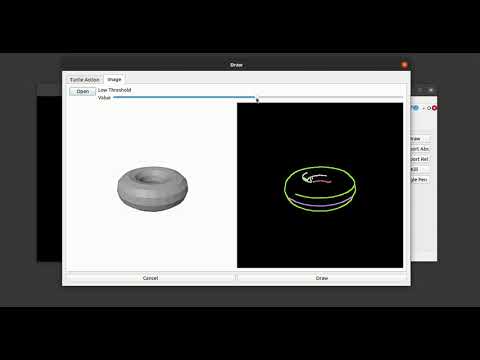
And the second tab to let one or more turtles draw an image.
Expand for rqt turtle draw image animation.

Both of the following guis make use of QRunnable and QThreadPool to avoid blocking the gui and allow to cancel the ongoing drawing task.
The implementation of both workers ActionWorker
and ImageWorker uses concepts from the PyQt5 Book.
Other threading resources:
- update-qprogressbar-during-qthread-work-via-signal
- QThread example
- Qt Threading Basics
- Multithreading Technologies in Qt
- Your doing it wrong
- How to really, truly use QThread
- QThread Details
- QThreadPool Details
Draw Shape
The turtle_actionlib provides a shape_server that is used to let the turtle named turtle1 draw
a shape. For this the Draw class defines an action client actionlib::SimpleActionClient<turtle_actionlib::ShapeAction> ac_;
which is used to send an action goal containing the number of edges and the radius of the shape to the server.
See also the detailed description of the actionlib to learn more about how it works.
The following shows the gui to adjust these two settings including the timeout to automatically cancel the goal:

With the turtle_actionlib/Shape.action its possible to specify the number of edges (int32) and the radius (float32).
To send the specified shape (also known as goal) the client is used as follows:
void Draw::drawShape()
{
    ROS_INFO("Waiting for action server to start.");

    if (!ac_.isServerConnected())
    {
        QMessageBox msgBox;
        msgBox.setText("Action server not connected");
        msgBox.setInformativeText("Please run 'rosrun turtle_actionlib shape_server' and press Ok or cancel \
                                   to avoid blocking rqt_turtle gui while wating for shape_server.");
        msgBox.setStandardButtons(QMessageBox::Ok | QMessageBox::Cancel);
        int ret = msgBox.exec();
        if (ret == QMessageBox::Cancel)
        {
            return;
        }
    }

    /// Wait for the action server to start
    ac_.waitForServer(); //will wait for infinite time
    ROS_INFO("Action server started, sending goal.");

    /// Create ActionWorker which will send a goal to the action server
    int edges = ui_->lineEditEdges->text().toInt();
    float radius = ui_->lineEditRadius->text().toFloat();
    float timeout = ui_->lineEditTimeout->text().toFloat();
    ActionWorker* action_worker = new ActionWorker(ac_, edges, radius, timeout);

    ui_->btnDraw->setText(QString("Cancel Goal"));
    disconnect(ui_->btnDraw, SIGNAL(clicked()), this, SLOT(on_btnDraw_clicked()));
    connect(ui_->btnDraw, SIGNAL(clicked()), action_worker, SLOT(kill()));
    connect(ui_->btnDraw, SIGNAL(clicked()), this, SLOT(on_btnCancelGoal_clicked()));

    threadpool_.start(action_worker);
}
First, this code checks wheater the client is connected to the shape_server to make sure it is available.
If this is not the case a QMessageBox is used to inform the user that the
shape_server in the turtle_actionlib should be started with rosrun turtle_actionlib shape_server.
Also note that the turtle_actionlib works with a turtle named turtle1. So make sure that a turtle with that name exists.
To send the goal to another named turtle you can for example run topic_tools/relay.
After the action server is started a new class object of type ActionWorker is created on the heap.
This ActionWorker allows us to send the the goal to the shape server without blocking the main gui.
For this QThreadpool together with QRunnable is used.
class ActionWorkerKilledException{};

class ActionWorker : public QObject, public QRunnable
{
    Q_OBJECT

    /// Reference to the action client instanciated in the Draw class.
    actionlib::SimpleActionClient<turtle_actionlib::ShapeAction>& ac_;
    /// Number of edges of the regular polygon
    int edges_;
    /// Radius of the regular polygon
    float radius_;
    /// Duration after which the goal will be canceled and the ActionWorker killed.
    float timeout_;
    /// Defaults to false. Set to true when the kill() slot is called.
    bool is_killed_;

public:
    /**
     * @brief Construct a new Action Worker object
     *
     * @param ac Reference to the action client which is instanciated in the Draw class that creates this worker.
     * @param edges Specifies the number of edges the worker should draw.
     * @param radius Specifies the shape radius the worker should use while drawing.
     * @param timeout Specifies the duration after which the goal is canceled.
     */
    ActionWorker(actionlib::SimpleActionClient<turtle_actionlib::ShapeAction>& ac, int edges, float radius, float timeout);

    /**
     * @brief Overriede of QRunnable to run the drawing task in another thread from the QThreadPool.
     *
     */
    void run() override;

signals:
    /**
     * @brief Singals the current progress of the ongoing action. Currently not used
     *
     * @param value could represent the percentage of the progress.
     */
    void progress(int value);

public slots:
    /**
     * @brief Slot to receive a kill signal when the goal should be canceled.
     *
     */
    void kill();
};
Inside the ActionWorker::run() method the current actionlib_msgs/GoalStatus
can be checked with the actionlib::SimpleActionClient::getState() method.
This implementation is similar to the one described in Writing a Callback Based Simple Action Client.
It avoids blocking until the goal is complete, which would be possible when using waitForResult described in the [SimpleActionClient] tutorial.
To cancel the goal after the specified timeout is reached the code makes use of ros::Time,
ros::Duration and the possible arithmetic.
While the goal is pursued the Draw button changes its text to CancelGoal and the connections are updated, see Draw::drawShape:
ui_->btnDraw->setText(QString("Cancel Goal"));
disconnect(ui_->btnDraw, SIGNAL(clicked()), this, SLOT(on_btnDraw_clicked()));
connect(ui_->btnDraw, SIGNAL(clicked()), action_worker, SLOT(kill()));
connect(ui_->btnDraw, SIGNAL(clicked()), this, SLOT(on_btnCancelGoal_clicked()));
Pressing the “new” Cancel Goal button reverts the button text and the connections to its original state:
void Draw::on_btnCancelGoal_clicked()
{
    ui_->btnDraw->setText("Draw");
    disconnect(ui_->btnDraw, SIGNAL(clicked()), this, SLOT(on_btnCancelGoal_clicked()));
    connect(ui_->btnDraw, SIGNAL(clicked()), this, SLOT(on_btnDraw_clicked()));
}
Other related references to actionlib:
- Calling Action Server without Action Client
turtle_actionlib/src/shape_client.cpp- Simple ActionClient Threaded
Draw Image
With the plugin it’s also possible to select an image from disk with the QFileDialog (set to the home directory by default) and let multiple turtles draw the contours.
The contours are found with Canny() and
findContours from OpenCV.
The slider in the gui allows you to set the low threshold of the canny edge detection algorithm which will change the number of detected edges.
A helpful resource to convert a cv::Mat, used by OpenCV, to a QImage is this line of code:
QImage imgIn= QImage((uchar*) img.data, img.cols, img.rows, img.step, QImage::Format_RGB888);
It is used to display the edge image inside the Draw.ui using a QLabel by setting its QPixmap and scaling it to the same size as turtlesim (500x500 pixel).
See the image viewer example for a good reference on what can be done this way.
For more information on OpenCV Canny and finding contours, see
To draw the image faster, using multiple turtles, QThreadpool together with QRunnable is used.
For this, the ImageWorker class inherits from QRunnable and QObject to allow the usage of Qt signals. In this case a progress(QString name, int progress)
and finished(QString name) is used to update the progress of multiple workers.
The following class shows the header of the ImageWorker class. For the source code, please refer to the image_worker.cpp.
class ImageWorkerKilledException{};


class ImageWorker : public QObject, public QRunnable
{
    Q_OBJECT

    bool is_killed_;

    Turtle turtle_;
    std::vector<std::vector<cv::Point> > contours_;
    int num_contours_;
    int num_points_;
    int idx_contour_;
    int idx_point_;
    int percent_;
    float turtlesim_size_;

    turtlesim::TeleportAbsolute sTeleportAbs_;

public:
    ImageWorker(Turtle turtle, std::vector<std::vector<cv::Point> > contours, float turtlesim_size = 500.0);


    void run() override;

signals:
    void progress(QString name, int value);
    void finished(QString name);

public slots:
    void kill();
};
Install and Run your Plugin
CMakeLists.txt
Configure the CMakeLists.txt using Qt macros,
see also Qt’s Build with CMake.
The following macros create rules for calling the Meta-Object compiler (moc) on the given source/ui file.
qt5_wrap_uithe command will configure the project to process*.uifiles into valid C++ui_XXXX.h, source, source.qt5_wrap_cpp
Note that these are old and there exist new AUTOMOC (source) and AUTOUIC options in modern CMake.
Note: ui_XXXX.h files are generated in the build directory ${CMAKE_CURRENT_BINARY_DIR}. This is why we need to use these set commands:
# ensure generated header files are being created in the devel space
set(_cmake_current_binary_dir "${CMAKE_CURRENT_BINARY_DIR}")
set(CMAKE_CURRENT_BINARY_DIR "${CATKIN_DEVEL_PREFIX}/${CATKIN_GLOBAL_INCLUDE_DESTINATION}")

qt5_wrap_ui(rqt_turtle_UIS_H ${rqt_turtle_UIS})

set(CMAKE_CURRENT_BINARY_DIR "${_cmake_current_binary_dir}")
These commands temporarily change the CMAKE_CURRENT_BINARY_DIR to "${CATKIN_DEVEL_PREFIX}/${CATKIN_GLOBAL_INCLUDE_DESTINATION}" which is a
private include folder inside the devel space. This is done to save the ui header file, created with the meta objec compiler (moc), into the
devel space. TODO confirm this?
# TODO use?
find_package(class_loader)
class_loader_hide_library_symbols(${PROJECT_NAME})
Also make sure in your CMakeLists.txt, to uncomment a line:
## Uncomment this if the package has a setup.py. This macro ensures
## modules and global scripts declared therein get installed
## See http://ros.org/doc/api/catkin/html/user_guide/setup_dot_py.html
catkin_python_setup()
Add install macro that puts the script into a location where it is rosrun-able is declared. For example:
## Mark executable scripts (Python etc.) for installation
## in contrast to setup.py, you can choose the destination
# For our (optional) script to be installed to the right location,
# if users install your package, this line is required
catkin_install_python(PROGRAMS
  scripts/rqt_turtle
  DESTINATION ${CATKIN_PACKAGE_BIN_DESTINATION}
)
TODO install stuff:
#############
## Install ##
#############

# TODO????
# See http://wiki.ros.org/rqt/Tutorials/Create%20your%20new%20rqt%20plugin
# And https://github.com/ros-visualization/rqt_image_view/blob/master/CMakeLists.txt
# TODO?????
#Add the following lines to call the resource and plugin.xml # TODO required?
#install(DIRECTORY include/${PROJECT_NAME}/
#  DESTINATION ${CATKIN_PACKAGE_INCLUDE_DESTINATION}
#)
#install(DIRECTORY
#  resource
#  DESTINATION ${CATKIN_PACKAGE_SHARE_DESTINATION}
#)
#install(FILES
#  plugin.xml
#  DESTINATION ${CATKIN_PACKAGE_SHARE_DESTINATION}
#)


## Mark executables for installation
## See http://docs.ros.org/melodic/api/catkin/html/howto/format1/building_executables.html
# install(TARGETS ${PROJECT_NAME}_node
#   RUNTIME DESTINATION ${CATKIN_PACKAGE_BIN_DESTINATION}
# )

## Mark libraries for installation
## See http://docs.ros.org/melodic/api/catkin/html/howto/format1/building_libraries.html
install(TARGETS ${PROJECT_NAME}
  ARCHIVE DESTINATION ${CATKIN_PACKAGE_LIB_DESTINATION}
  LIBRARY DESTINATION ${CATKIN_PACKAGE_LIB_DESTINATION}
  RUNTIME DESTINATION ${CATKIN_GLOBAL_BIN_DESTINATION}
)

## Mark cpp header files for installation
# install(DIRECTORY include/${PROJECT_NAME}/
#   DESTINATION ${CATKIN_PACKAGE_INCLUDE_DESTINATION}
#   FILES_MATCHING PATTERN "*.h"
#   PATTERN ".svn" EXCLUDE
# )

## Mark other files for installation (e.g. launch and bag files, etc.)
# install(FILES
#   # myfile1
#   # myfile2
#   DESTINATION ${CATKIN_PACKAGE_SHARE_DESTINATION}
# )
setup.py
The setup.py is used to install a python package and ROS makes use of this too if a package contains python scripts. See also this tutorial, building libraries and this answer See this section:
See the Running rqt section for how to run your plugin.
With catkin, no matter which method in the link above you want to run your plugin, you need to install it via CMake which puts the script into a package-specific folder which is not on the PATH.
Add macros to your setup.py (reference). For example, after adding the line the section that contains it might look like :
from distutils.core import setup
from catkin_pkg.python_setup import generate_distutils_setup

d = generate_distutils_setup(
    packages=['rqt_mypkg'],
    package_dir={'': 'src'},
)

setup(**d)
Faced Problems
The original plan was to reuse the service caller and topic publisher rqt plugins. However, these plugins are written in Python which makes it hard to use the ui files because they reference some Python specific Qt widgets that are not available in C++.
To make use of other rqt plugins follow this tutorial and understand What does find_package() do. Also this answer might be helpful.
The problem with these approaches are that most of the plugins are written in Python. The promote widget method will work if your plugins use the same programming language because Python doesn’t create a header file.
Another problem was that the other plugins don’t generate a PackageNameConfig.cmake file which would allow to export the plugin headers and/or their ui files using the catkin_package() macro.
This is why I just copied the ui files from ServiceCaller.ui into the resources folder of the rqt_turtle plugin and adjusted its elements with the Qt Designer.
Otherwise we could have used
find_package(catkin REQUIRED COMPONENTS
  roscpp
  rqt_gui
  rqt_gui_cpp
  rqt_topic
)
or
find_package(rqt_topic)
Pro tip: Use message(${my_package_FOUND}) inside your CMakeLists.txt to check if the package was found. If it’s found this will output 1 or True,
nothing otherwise.
This will define some cmake variables (found here) that make it possible to include the exported resources from that packages using
# WIP TODO remove here (only used for rqt_topic)
include_directories(${catkin_INCLUDE_DIRS})
message(${catkin_INCLUDE_DIRS})
message(${rqt_topic_INCLUDE_DIRS})
Then, for example using the ui file should work like this:
set(rqt_turtle_UIS
  resources/turtle_plugin.ui
  ${rqt_topic_INCLUDE_DIRS}/resource/TopicWidget.ui
)
Launch the plugin
To launch a rqt plugin make sure to read the Install and Run your plugin section and the Running rqt User Guide.
In case it is not working try to use some solutions from this answer.
Future Work
- Add control widgets to publish to the
/turtleX/cmd_velof typegeometry_msgs/Twisttopic. - Add tests using rostest and roslaunch test tag.
- Use
rossrv showto get the type of a rosservice and use the information for therequest_tree_widgetof theServiceCaller.ui.
Comments